React has been a very popular javascript library for developing user intefaces basically the front end of web applications. In the similar way react native is also a very popular library for building cross platform mobile applications. It means by writing javascript code we can generate both android and ios applications separately. An interesting thing is that if someone has a good knowledge over react then he has almost 80% knowledge of react native. So the react developers should give it a try. Today I would like to discuss about a react native app that can be built easily with all the knowledge of react plus some new knowledge of react native. So those who are familiar with react and also want to start learning react native are encouraged to go through this post.
Today I will build a ToDo app with react native and will run it in an android device. It will have the following features:
- Add a task
- Show all tasks
- Mark a task as done
- Delete a task
Project setup
At first we will setup the environment for react native using this doc as per our OS. After successfully setting up the environment we will initiate a react native project using the following command and go to that directory.
react-native init TodoApp
cd TodoApp
Now we will be using two third party libraries for Async Storage and vector icons using the following command
npm i @react-native-async-storage/async-storage react-native-vector-iconsCode Description
We will be editing inside the src directory. We will add four components in our project. These are the main App, Delete Modal, Add Modal and Todo Item. Each of these components are functional component with hooks and will have a stylesheet associated with them. Let us describe them one by one.
Add Modal
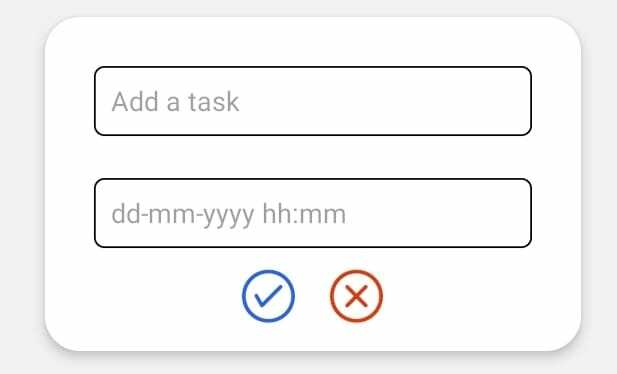
This component is mainly a Modal that will be popped up on clicking an add button to add a todo task. It will contain two TextInput for task title and timestamp. It will also have two TouchableOpacity for adding the task and discarding it. Inside src directory we will create a js file named TaskModal and write the following code:
import React, { useState } from 'react';
import { View, Text, StyleSheet, Modal, TouchableOpacity, TextInput } from 'react-native';
import Icon from 'react-native-vector-icons/AntDesign';
import { COLORS } from './App';

const TaskModal = ({ isOpen, onClose, onSuccess }) => {
    const [title, setTitle] = useState('');
    const [date, setDate] = useState('');

    const addData = () => {
        if(title && date) {
            onSuccess(title, date);
            setDate('');
            setTitle('');
        }
    };

    const closeModal = () => {
        onClose();
        setTitle('');
        setDate('');
    };

    return (
        <Modal
            visible={isOpen}
            onRequestClose={onClose}
            transparent={true}
        >
            <View style={styles.centeredView}>
                <View style={styles.modalView}>
                    <TextInput
                        placeholder="Add a task"
                        style={styles.input}
                        value={title}
                        onChangeText={(value) => setTitle(value)}
                    />
                    <TextInput
                        placeholder="dd-mm-yyyy hh:mm"
                        style={styles.input}
                        value={date}
                        onChangeText={(value) => setDate(value)}
                    />
                    <View style={styles.actionHolder}>
                        <TouchableOpacity
                            onPress={addData}>
                            <Icon name="checkcircleo" size={30} color={COLORS.blue} />
                        </TouchableOpacity>
                        <TouchableOpacity onPress={closeModal}>
                            <Icon name="closecircleo" size={30} color={COLORS.red} />
                        </TouchableOpacity>
                    </View>
                </View>
            </View>
        </Modal>
    );
};

const styles = StyleSheet.create({
    centeredView: {
        flex: 1,
        justifyContent: "center",
        alignItems: "center"
      },
      modalView: {
        backgroundColor: "white",
        borderRadius: 20,
        padding: 16,
        alignItems: "center",
        shadowColor: "#000",
        shadowOffset: {
          width: 0,
          height: 2
        },
        shadowOpacity: 0.25,
        shadowRadius: 4,
        elevation: 5
      },
      input: {
        height: 40,
        width: 250,
        margin: 12,
        borderWidth: 1,
        padding: 10,
        borderRadius: 6,
      },
      actionHolder: {
          flexDirection: 'row',
          justifyContent: 'space-around',
          width: 100,
      }
});

export default TaskModal;
After completing the rest of the code and successfully building this component will look as following:

Todo Item
This component will render a todo task row. Here we will have the title of the task and a timestamp of doing it along with a check and delete button. Inside src directory we will create a js file named TaskItem and write the following code:
import React from 'react';
import Icon from 'react-native-vector-icons/AntDesign';
import { View, StyleSheet, Text, TouchableOpacity } from 'react-native';
import { COLORS } from './App';

const TaskItem = ({ task, onDelete, onCheck }) => (
    <View style={styles.parentHolder}>
        <View style={styles.mainHolder}>
            <View style={styles.itemHolder}>
                <Text style={{...styles.itemText, ...styles.largeText}}>{task.title}</Text>
                <Text style={{...styles.itemText, ...styles.smallText}}>{task.time}</Text>
            </View>
            <View style={styles.actionHolder}>
                <TouchableOpacity onPress={() => onDelete(task.id)}>
                    <Icon name="delete" size={18} color={COLORS.red} />
                </TouchableOpacity>
                <TouchableOpacity style={styles.spaced} onPress={() => onCheck(task.id)}>
                    <Icon name={task.completed ? `checkcircle` : `checkcircleo`} size={18} color="#2b5fed" />
                </TouchableOpacity>
            </View>
        </View>
    </View>
);

const styles = StyleSheet.create({
    actionHolder: {
        flexDirection: 'row',
    },
    spaced: {
        marginStart: 16,
        marginEnd: 4,
    },
    parentHolder: {
        padding: 16,
        borderBottomWidth: 1,
        borderBottomColor: '#fff',
    },
    mainHolder: {
        flexDirection: 'row',
        justifyContent: 'space-between',
        alignItems: 'center',
    },
    itemHolder: {
        flexDirection: 'column',
    },
    itemText: {
        color: '#1f1b1b',
    },
    largeText: {
        fontSize: 16,
        fontWeight: '500',
    },
    smallText: {
        fontSize: 14,
    },
    blueText: {
        color: '#2b5fed',
    },
    fadeBlueText: {
        color: '#c7d2f2',
    }
});

export default TaskItem;
In the add task modal if we add title Attend office meeting and timestamp 14-12-2021 9:30 AM and press the check button then a new todo task will be created which will look like this:
 On clicking the check button the task will be checked and look like following:
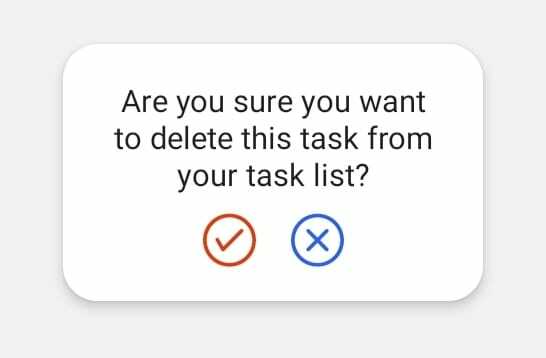
 On clicking the delete button a delete confirm modal will pop up. For this we need to create a js file named
 ConfirmDelete in src directory of the root folder and write following code:
import React from 'react';
import { View, Text, StyleSheet, Modal, TouchableOpacity, TextInput } from 'react-native';
import Icon from 'react-native-vector-icons/AntDesign';
import { COLORS } from './App';

const ConfirmDelete = ({ isOpen, onClose, onDelete }) => {
    return (
        <Modal
            visible={isOpen}
            onRequestClose={onClose}
            transparent={true}
        >
            <View style={styles.centeredView}>
                <View style={styles.modalView}>
                    <Text style={styles.content}>Are you sure you want to delete this task from your task list?</Text>
                    <View style={styles.actionHolder}>
                        <TouchableOpacity onPress={onDelete}>
                            <Icon name="checkcircleo" size={30} color={COLORS.red} />
                        </TouchableOpacity>
                        <TouchableOpacity onPress={onClose}>
                            <Icon name="closecircleo" size={30} color={COLORS.blue} />
                        </TouchableOpacity>
                    </View>
                </View>
            </View>
        </Modal>
    );
};

const styles = StyleSheet.create({
    centeredView: {
        flex: 1,
        justifyContent: "center",
        alignItems: "center"
      },
      modalView: {
        backgroundColor: "white",
        borderRadius: 20,
        padding: 20,
        alignItems: "center",
        shadowColor: "#000",
        shadowOffset: {
          width: 0,
          height: 2
        },
        shadowOpacity: 0.25,
        shadowRadius: 4,
        elevation: 5
      },
      content: {
          width: 200,
          textAlign: 'center',
          marginBottom: 10,
          color: '#1f1b1b',
          fontSize: 16,
      },
      actionHolder: {
          flexDirection: 'row',
          justifyContent: 'space-around',
          width: 100,
      }
});

export default ConfirmDelete;
This will look like following:
 On clicking the check button the task will be deleted and on clicking the cross button the delete action will be discarded.
App
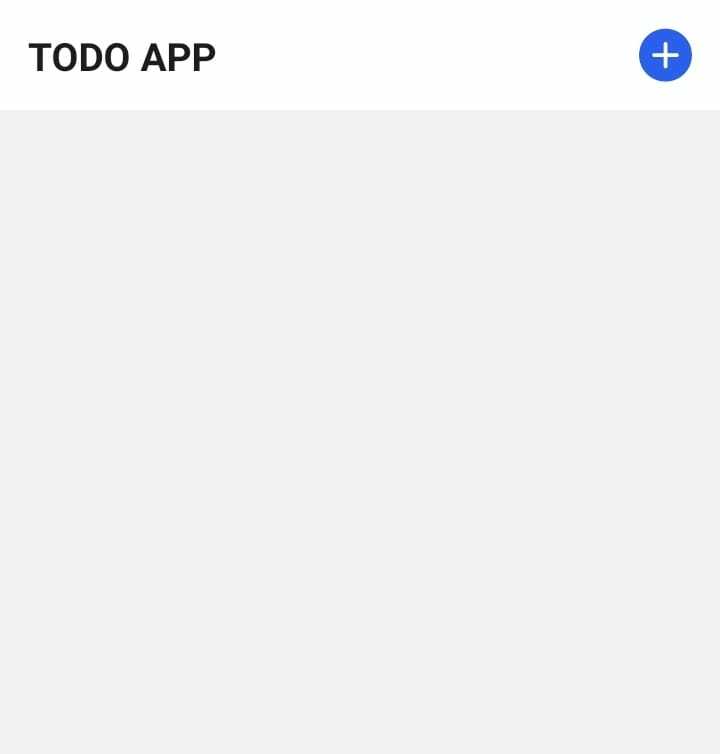
Now we are left with our final and main component. In this App component we will render discussed three components along with FlatList which will contain all the tasks. The wrapping component will be a SafeAreaView. At the very beginning the app will look like:
 The code of
 App is:
import React, { useState, useEffect } from 'react';
import Icon from 'react-native-vector-icons/AntDesign';
import AsyncStorage from '@react-native-async-storage/async-storage';
import {
  FlatList,
  SafeAreaView,
  ScrollView,
  StatusBar,
  StyleSheet,
  Text,
  TouchableOpacity,
  useColorScheme,
  View,
} from 'react-native';

import {
  Colors,
  DebugInstructions,
  Header,
  LearnMoreLinks,
  ReloadInstructions,
} from 'react-native/Libraries/NewAppScreen';
import TaskItem from './TaskItem';
import TaskModal from './TaskModal';
import ConfirmDelete from './ConfirmDelete';

export const COLORS = { white: '#fff', main: '#1f1b1b', blue: '#2b5fed', grey: '#f2f2f2', red: '#e3360b', fadeBlue: '#c7d2f2' };


const App = () => {
  const [modalOpen, setModalOpen] = useState(false);
  const [confirmOpen, setConfirmOpen] = useState(false);
  const [deleteTaskId, setDeleteTaskId] = useState(0);
  const [tasks, setTasks] = useState([]);

  useEffect(() => {
    if (tasks.length !== 0) {
      AsyncStorage.setItem('todos', JSON.stringify(tasks));
    }
  }, [tasks]);

  useEffect(() => {
    fetchData();
  }, []);

  const fetchData = async () => {
    try {
      const todos = await AsyncStorage.getItem('todos');
      if (todos != null) {
        setTasks(JSON.parse(todos));
      }
    } catch (error) {
      console.log(error);
    }
  };

  const openConfirmModal = (id) => {
    setConfirmOpen(true);
    setDeleteTaskId(id);
  }

  const deleteTask = () => {
    const newTasks = tasks.filter((task) => task.id !== deleteTaskId);
    setTasks(newTasks);
    setDeleteTaskId(0);
    setConfirmOpen(false);
  };

  const checkTask = (id) => {
    const newTasks = [...tasks];
    const _tasks = newTasks.map((task) => (
      task.id === id ? {...task, completed: !task.completed} : task
    ));
    setTasks(_tasks);
  };

  const addTask = (title, date) => {
    const task = {
      id: new Date().getTime(),
      title,
      time: date,
      completed: false,
    };
    setTasks(prevTasks => ([task, ...prevTasks]));
    setModalOpen(false);
  };

  return (
    <SafeAreaView style={styles.background}>
      <TaskModal isOpen={modalOpen} onClose={() => setModalOpen(false)} onSuccess={addTask} />
      <ConfirmDelete isOpen={confirmOpen} onClose={() => setConfirmOpen(false)} onDelete={deleteTask} />
      <View style={styles.header}>
        <Text style={styles.headerText}>TODO APP</Text>
        <TouchableOpacity onPress={() => setModalOpen(true)}>
          <Icon name="pluscircle" size={30} color={COLORS.blue} />
        </TouchableOpacity>
      </View>
      <FlatList
        data={tasks}
        renderItem={({item}) => ( <TaskItem task={item} onDelete={openConfirmModal} onCheck={checkTask} />)}
        />
    </SafeAreaView>
  );
};

const styles = StyleSheet.create({
  background: {
    flex: 1,
    backgroundColor: COLORS.grey,
  },
  header: {
    padding: 16,
    backgroundColor: COLORS.white,
    flexDirection: 'row',
    alignItems: 'center',
    justifyContent: 'space-between',
  },
  headerText: {
    fontSize: 20,
    fontWeight: 'bold',
    color: COLORS.main,
  },
  bottomView: {
    position: 'absolute',
    bottom: 20,
    right: 20,
  },
  addContainer: {
    width: 50,
    height: 50,
    borderRadius: 25,
    backgroundColor: COLORS.blue,
    flex: 1,
    alignItems: 'center',
    justifyContent: 'center',
  },
  addIcon: {
    fontSize: 32,
    color: COLORS.white,
  },
});

export default App;
On clicking the plus button in the top right corner then add task modal will be opned i.e. <TaskModal isOpen={modalOpen} onClose={() => setModalOpen(false)} onSuccess={addTask} /> this will be rendered. Here two functions are passed as props to the modal component which indicates lifting the state up. If we have a look at the addTask method which will be called when the user will add a task and press the check button in TaskModal component, it takes title and time from user input, creates a unique id and by default false for then completed field. Then the task will be prepended to the tasks state. The tasks are being rendered in a flatlist which takes two props data as array of data to display and renderItem which takes a method that tells how to display each row.
The final task is to save the todo tasks in device. We are using Async Storage for this purpose. We have used two useState hook one will be invoked when the app component is mounted then we will retrieve the data in form of string from the storage. The other will be invoked whenever the tasks state changes.
To run the project in an android device we will use the following command after connecting our android device:
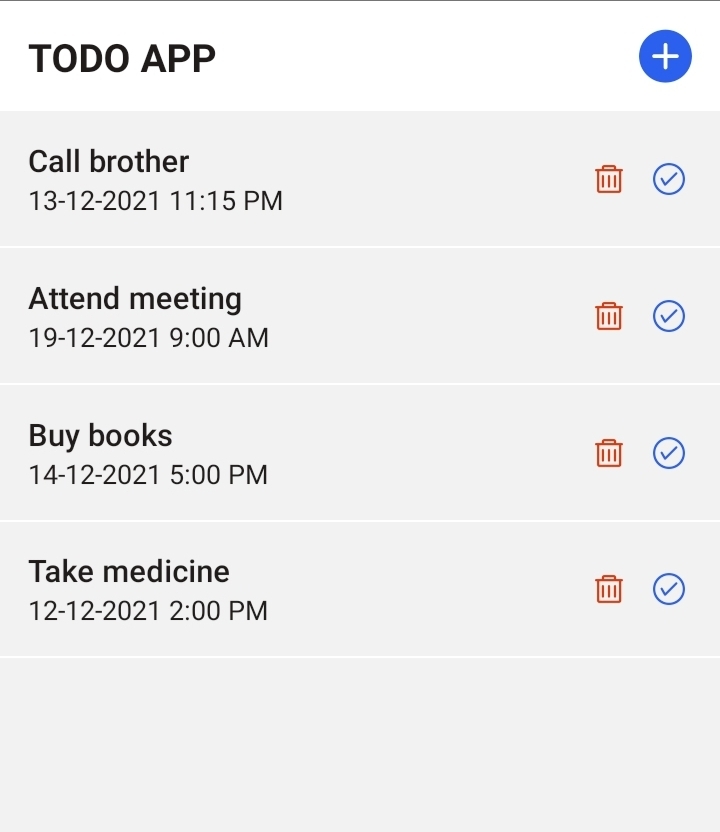
react-native run-androidAfter adding four tasks our app should look like this:

Thus we have built a simple Todo App with react native. The project codebase can be found here. Feel free to share your thoughts.
Happy Coding 😀😀😀😀😀